
As I stated in my last blog post, one of the many changes that occurred about a month ago was that I moved! As exciting as moving is, it can also be stressful. Believe me when I say that I was very stressed, however it all ended up coming together -- like always!
With how expensive everything is nowadays, I'm all about saving money. Roberto and I were fortunate enough to be given various pieces of furniture, kitchen items, etc. that our family members were no longer using. Although they were old, we found a way to turn those old pieces into the vision we wanted for our new home.
One of the hardest, yet most rewarding projects we conquered (along with the help of my dad), was remodeling all of my old bedroom furniture. This was a time consuming task and at first I had no idea how to go about it, but I was determined. Not only was this rewarding, but also a HUGE money saver! Now we get asked all the time how we redid everything, so I'm here to share.

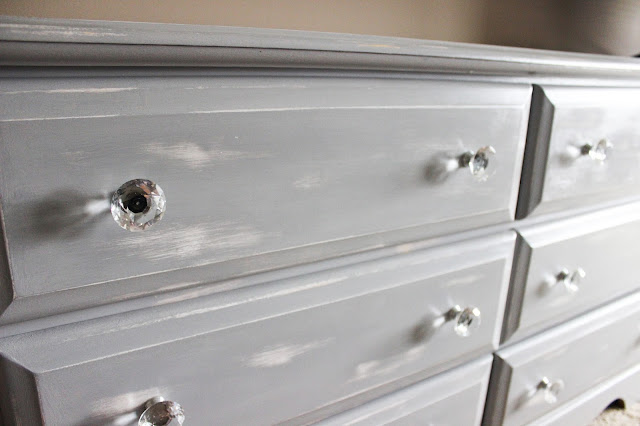
Here is one of the many pieces we redid. We wanted a distressed look to our bedroom furniture, however we didn't want the piece to look completely dull.
Here's the steps:
(**Materials needed are underlined & there are some links to the exact materials used!)
1. Using sand paper, gently rub all over the piece of furniture to remove all shine. Then take a wet wash cloth to remove any dust particles so that they don't stick to the furniture.
[caption id="attachment_1440" align="aligncenter" width="383"]
 My dad helping me prime the larger pieces![/caption]
2. Next, you need to prime! We used this Zinsser primer and it worked really really well. We only applied one coat and let this sit for about 2-4 hours before painting.

3. After the primer sits for 2-4 hours you are all ready to paint! The paint we used is pictured above. It was a chalk paint to help us achieve the distressed look. There are different ways that you can create your own chalk paint, but really liked the color of this one so we just bought it instead of making our own.

4. We applied two coats of chalk paint. In between each coat, we let the smaller pieces sit for about 20 minutes and the bigger pieces sit for about 45 minutes. After two coats were applied, we let all the pieces sit for at least 24 hours.

5. After letting the pieces sit for a good 24-48 hours, it was time to sand and seal! The fun part about this step is that you can distress the furniture as little or as much as you want -- there's no right or wrong way! I can't remember what sealer we used, but I'm pretty sure we got it at Walmart. Remember before you seal, to take a wet wash cloth to the pieces to remove and dust from the sand so it doesn't stick to the furniture.
After we sealed all the pieces, we let them sit for another 24-38 hours.
After we sealed all the pieces, we let them sit for another 24-38 hours.
Completed Pieces
[caption id="attachment_1444" align="aligncenter" width="348"]
 Before[/caption]
[caption id="attachment_1445" align="aligncenter" width="352"]
 After[/caption]
[caption id="attachment_1446" align="aligncenter" width="491"]
 Detail // Knobs[/caption]
[caption id="attachment_1447" align="aligncenter" width="316"]
 Before[/caption]
[caption id="attachment_1448" align="aligncenter" width="350"]
 After[/caption]
[caption id="attachment_1450" align="aligncenter" width="309"]
 Before[/caption]
[caption id="attachment_1449" align="aligncenter" width="362"]
 After[/caption]


Total/Savings
The total spent on paint (including primer and sealer) was probably around $130. We also bought these glass knobs from Amazon to help modernize the look which cost us another $45. The new dresser mirror in our room was from Home Goods and was an additional $70. So not including the bed and mattress, we were able to complete our bedroom furniture for less than $250 compared to buying a set of furniture (with less pieces) that would of cost us over $900. I'd say that's a steal.
So what other ways do we like to save for our home? Here's some tips to help!
Tips to SAVE even more $$
One big thing Roberto and I did before moving was making a list of things we have, things we would like to have, and things we absolutely needed. As I mentioned before we were lucky enough to get "hand me downs" from family. Sure, it may not have been exactly what we wanted, but we made it our own. If you're lucky enough to get items given to you, take them and recreate them! If not, bargain shop until you get an amazing deal!


Take our living room for example. We were given these two comfy couches. At first I wasn't too excited about the greenish color, but they were comfy and FREE! So to make these couches more our style, I got rid of the older looking pillows that came with it and bought these cream/ silver foil looking pillows.
Sometimes it takes something as small as this to make something older things look new again!


We love our keurig coffee, however overtime k-cups can get expensive! Instead, we use these reuseable k-cups and just buy regular coffee. K-cups can run about $15 bucks for less than 50 of them. If we each have a cup of day, those would only last us 25 days. By using these reusable k-cups, I can buy a huge thing of coffee for $9 and get WAY more out of it.

There's nothing worse than when you go to cook after you move and realize you don't have any herbs or spices. What's even more annoying is when you can't keep track of all the different spices that you will need for different recipes.
Investing in this spice rack has been on of my FAVORITE things since moving. Plus when your getting low, you will know exactly what you need to fill up on since they all are labeled. It literally has everything to cook and everyone always asks about it. We got ours from Sam's Club, however if you don't have a membership you can also buy it here.

If you're a germaphobe like me then this next one is for you. I constantly wash my hands and used to find myself going through a lot of soap. By purchasing reusable soap dispensers and buying soap in bulk, it definitely adds to the savings overtime. Sure you may pay more initially for the dispenser, however you can then buy a huge thing of soap in bulk for $3 vs. buying a little soap that won't last very long for $3. It may seem crazy, but these little changes of saving can add up.


One thing we really wanted to do was make our second bedroom into an office space so that Roberto could work there when he works from home and so that I can blog in this space as well. Desks are another thing that can be quite expensive so why not make your own?
By taking this desk top and using brackets to secure it, we were able to create a great working space for a reasonable price! I initially didn't think the colors would go together well, but I think it all came together. The desktop, brackets, and chair were all purchased at IKEA.

If there's one BIG tip I can give you when moving, it's that you can remain true to your style while on a budget. Sure it may take some time, but shop around because you never know what deals are out there.
I found this shower curtain for our guest bathroom for $14 from Home Goods. It was a good price and reflected our love for traveling. If had I bought the first shower curtain I saw because there was a sale, I would have never found this beauty.
Although moving may be stressful, there are definitely ways to make it all work. For the longest time I was trying to get a vision for what i wanted my new home to be like without breaking the bank. And now, after long days and hard work, my vision became reality. Yours can too. ♥

No comments:
Post a Comment